I built a system for getting valid Let’s Encrypt certificates for appliances like a UniFi Cloud Key and a Synology NAS which I keep behind my firewall at home. I use the DNS challenges so I don’t have to directly expose these systems to the public Internet.
Context: my home infrastructure
My home infrastructure is deployed using a system I call
psyops,
for personal sys ops.
I use Ansible wherever it makes sense,
including for the resources discussed in this post.
psyops is not always that well documented,
and probably can’t be used directly by anybody else.
I will however be able to show code from its repo to explain how my system works for this post,
and I hope that is useful enough for others as an example.
Security focus
I am strongly interested in security and privacy, and I spend effort to keep my data on my own systems under my control.
In this case, that means
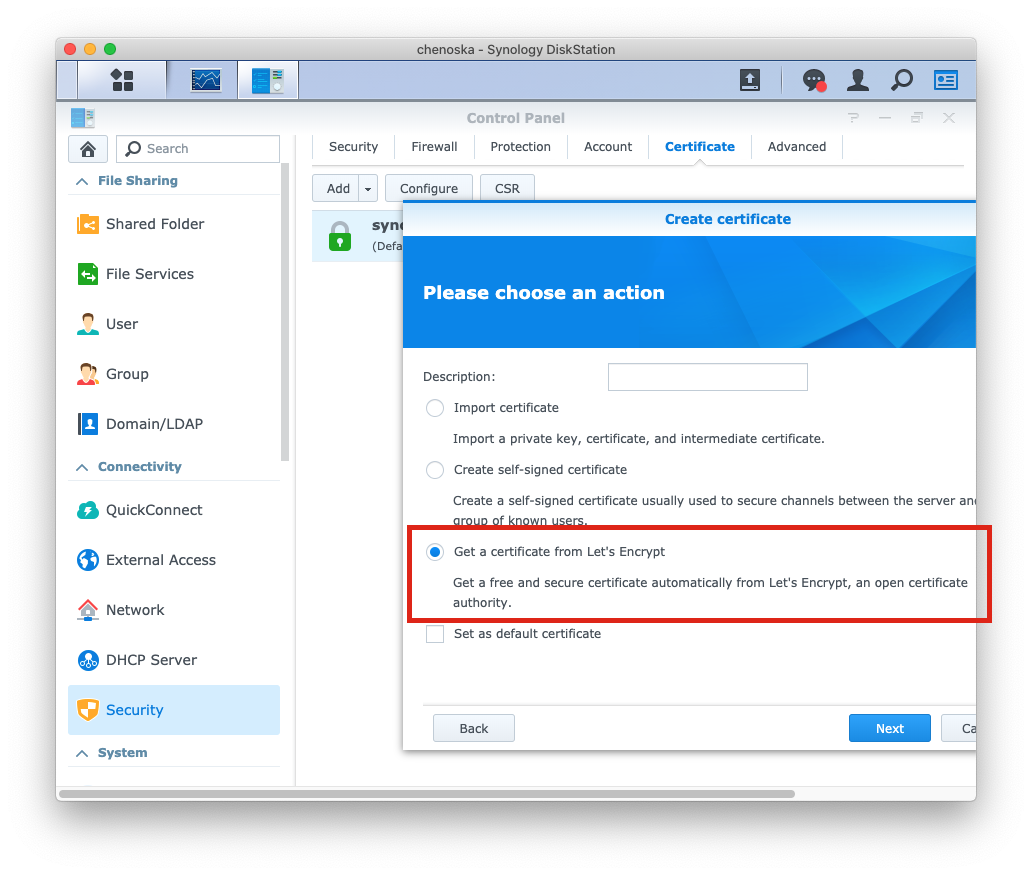
- Managing the Cloud Key directly, not through Ubiquiti’s cloud dashboard. By default, this uses a self-signed HTTPS certificate. My system allows using a real certificate from Let’s Encrypt.
- Keeping the Synology NAS off the public Internet. The Synology can get its own Let’s Encrypt certificate, but it uses an HTTPS challenge for this purpose, since that’s simpler to configure. My system allows using a DNS challenge, so that the NAS is never reachable on the public Internet.
My solution
My solution uses a separate Linux server to request renewed certificates via cron, and upload them to the device when they’ve changed.
I deploy it with several different Ansible roles:
acmedns_baseconfigures the Linux server with prerequisites for requesting certs.acmedns_remote_hostconfigures each appliance with prerequisites for allowing the Linux server to upload new certs to it.- Device-specific roles like
acmedns_cloudkey_updaterandacmedns_syno_updaterconfigure each appliance with device-specific cert installation scripts.
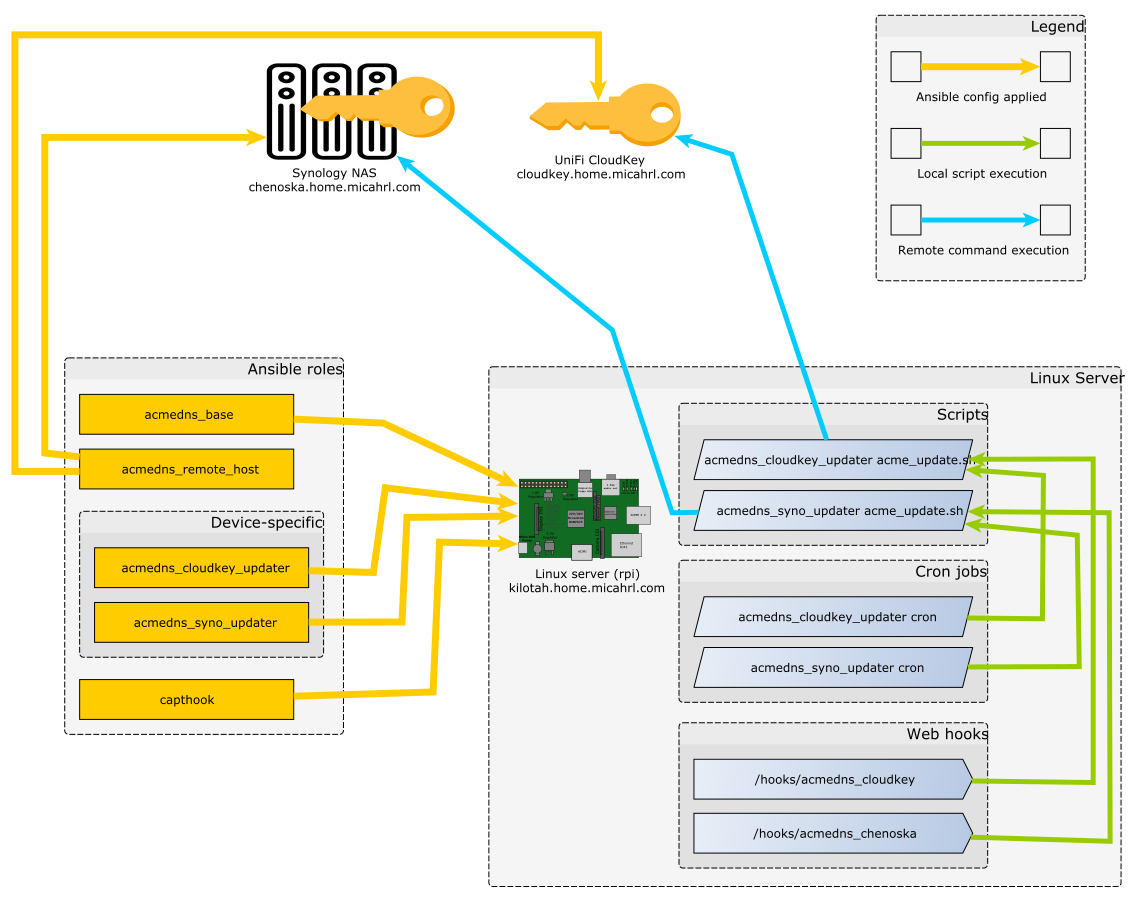
Solution diagram
I made a pretty picture1:

acmedns_base
acmedns_base
configures a Linux server with prerequisites for requesting certs from Let’s Encrypt,
including installing packages and setting up a user for running cron jobs.
This role installs an ACME client called lego, along with a script I wrote called wraplego.py. It also installs an Amazon key and secret for managing my Route53 DNS zone.
This is a generic role that isn’t coupled to the type of device that needs a certificate. It is applied to the Linux server just once, regardless of how many certificates are being generated.
acmedns_remote_host
acmedns_remote_host
configures a device with prerequisites for allowing the server to upload new certs to it.
All this means is configuring a user with passwordless SSH and sudo.
This is a very small role and it is generic enough to apply to any type of device. Both of the appliances I have, the UniFi Cloud Key and the Synology NAS, are Linux based systems that use SSH and sudo, so this role gets applied the same way to both.
Device-specific roles
A set of device-specific roles configures the Linux server
to request certs for a specific domain name and install those certs to the correct appliance.
These roles install the actual cron jobs that we prepared for in the acmedns_base role,
including a unique acmedns_update.sh script which calls wraplego.py
and performs tasks for installing the certificates and restarting services.
Currently, I have:
-
acmedns_cloudkey_updaterconfigures the Linux machine to request certs for my UniFi Cloud Key. Note the Cloud Key -specific logic in its wrapper script. -
acmedns_syno_updaterconfigures the Linux machine to request certs for my Synology NAS. Note the Synology-specific logic in its wrapper script.
The Linux server
My system assumes an available Linux server on the network for running cron jobs. This system can be anything at all; in my case I use a Raspberry Pi 4 with a USB 3.0 SSD.
On my network, this machine is kilotah.home.micahrl.com.
wraplego.py
This script, mentioned previously as part of the acmedns_base role,
is a critical component because it will only request a new certificate
if an existing certificate doesn’t exist, is expired, or will expire soon.
This is critical because the Let’s Encrypt API endpoints will ruthlessly block clients with too many requests.
To do this, wraplego.py parses the certificate and decodes its expiration date.
If the expiration date is far enough in the future,
it does not even run lego to call the Let’s Encrypt API.
In development mode, wraplego.py can call lego against the Let’s Encrypt staging server,
which has a different and much higher rate limit,
but does not issue certificates trusted by browsers.
Route53 DNS
I am using Amazon Route53 for DNS even behind the firewall.
I resolve *.home.micahrl.com to private IP addresses in the 192.168.1.0/24 range.
This is deployed to Route53 by Ansible via a CloudFormation template by Ansible: MicahrlDotCom.cfn.yml. You can see in that file I have DNS entries for
cloudkey.home.micahrl.com, my UniFi Cloud Keychenoska.home.micahrl.com, my Synology NAS
As mentioned previously, I am using lego to solve ACME DNS challenges.
lego supports Route53 out of the box,
so all I have to do is provide it with an AWS secret and key
that grant access to my home.micahrl.com zone in Route53.
I store the secret and key securely with ansible-vault.
Extra credit: Web hooks
You might notice references to webhooks or capthook in some of the Ansible roles on GitHub.
These are not part of the core functionality,
but are still worth describing here.
For instance:
These rely on another Ansible role I’ve written called
capthook,
which installs the lightweight
webhook service
to the Linux server.
This setup lets me perform arbitrary tasks just by curling a special URL that points to my Linux server.
The hook.json templates I link to above are configured to run the acmedns_update script for each device,
which means that with a single curl command I can reprovision any device certificates.
This is especially helpful if I find a bug in one of these scripts and need to run it again immediately,
or if I have to reset one of my devices to factory defaults
and then reprovision to get its HTTPS certificates back.
The hooks are available at these two endpoints:
- For the Cloud Key:
http://kilotah.home.micahrl.com:8098/hooks/acmedns_cloudkey - For the Synology (whose hostname is
chenoska):http://kilotah.home.micahrl.com:8098/hooks/acmedns_chenoska
Those two hooks will work from anything on my home network that speaks HTTP,
including curl on any workstation I have,
or in the browser on my iPhone located elsewhere
and connected to my home network via a WireGuard VPN.
This implementation does not require authentication before hitting the web hooks. This is safe enough for my purposes because the web hooks will only renew the certificate if it is expiring anyway.
Alternative solutions
You can get a secure HTTPS connection to these two devices more simply if you’re willing to do things differently.
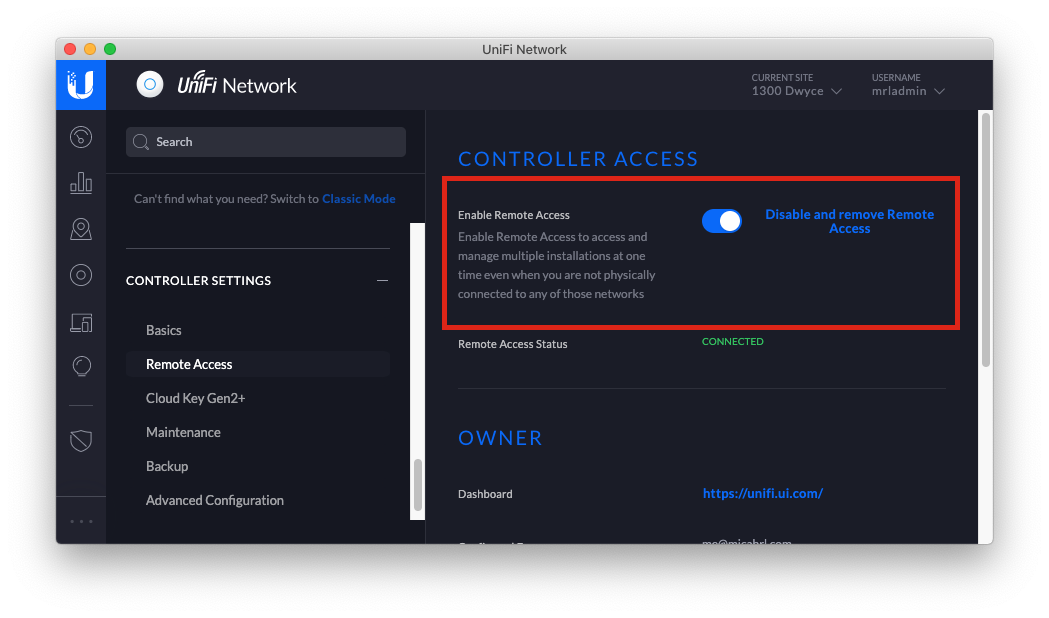
Simpler Cloud Key solution
Toggle the “Enable Remote Access” switch in the Cloud Key settings under “Controller Settings” -> “Remote Access”.
This allows you to manage the network via Ubiquiti’s unifi.ui.com dashboard.
I did not want to allow management through Ubiquiti’s infrastructure, so I use a WireGuard VPN and talk to the Cloud Key via a DNS name directly.
Simpler Synology solution
Allow the NAS to host a website on the public Internet. This will require port forwarding and a static IP address or a dynamic DNS solution.
When you have this, you can enable HTTP challenges in the Synology firmware itself.
I chose not to do this because I don’t want my NAS on the public Internet.
-
I made this diagram with yEd. I borrowed some SVGs from Wikimedia Commons: rpi2, nas, key. You can download the source diagram, if you like. ↩︎
-
Why not use the Raspberry Pi 4 diagram? I tried, but yEd’s SVG export didn’t work well with it – I would import the SVG and then resize it, and while PNG export would preserve my resize, SVG export would ignore my resize and export the Pi at its original size. Not sure why, but I’m stuck with this Raspberry Pi 1 SVG instead, which doesn’t exhibit that behavior. ↩︎